I did this tutorial just for fun. If you want to know how to do poses like mine, you can see the process I do every time right here! :D
__________________________________________
First things first!
Download the program Blender here. Follow all of the instructions! I don't state here how to install it, I only explain how to make the poses once it's installed, so do all of that first before reading this. Plus, this tutorial is geared more towards those that have had at least a tiny bit of experience with Blender, but I will still explain things in detail so it's understandable.
Always remember, practice makes perfect!
I'm going to try my best to explain every step as I go, but know that if you're a beginner and you begin to get frustrated, it's really okay! Stop and come back to it later! It will not come to you just like THAT, but as the underlined sentence above states, practice makes perfect, and you'll get it eventually, hopefully quickly if/when you follow my steps! It's really not as hard as it seems! ^_^
Have an idea of what you want to do before you begin!
What I normally do when focusing on getting an individual picture for a section of writing in my chapter, I'll reread the paragraph and focus on my favorite part, or the best/most important part of that section to portray and start from there. If you already have an emotion to show in their face, as well as how you want your Sim's body to look when posed, then keep that in your mind and don't let it go! Poses in your mind will become easier to portray in blender the more you practice and understand the anatomy and movement of the joints!
The mirror is your friend!
If you're ever having trouble figuring out how to move a limb in Blender, it makes it SO much easier to figure out if you go to your bathroom mirror/body mirror/whatever and watch your own limbs and how they move! It's really helped me a LOT at times when trying to figure out certain poses.
__________________________________________
Again, before I begin, please note that I am beginning at the point where you should already have Blender installed, ready, and open to understand this tutorial. I am not going to tell you how to install it and all that, so do that first, then you're ready to read this tutorial.
__________________________________________
It might seem difficult at first, but by how many poses I've made (well over 3000+ I'd say), it will come easy for you the more you do and you'll be able to make a pose within minutes the more you try and get used to it all. Plus, there's plenty of shortcuts along the way that I've figured out and it makes pose making go a lot quicker ;D
Again, keep in mind, this if how I do poses, so step by step, I'm going to be telling you how I make my own. Don't misinterpret this as a normal tutorial or think that this is what you have to do or whatever, this is just how I've gotten used to making poses and this way let's me be able to make many in one sitting XD
A MORE IN DEPTH DISCLAIMER
(because I feel like it might be necessary)
I'll be stating some things that are my own opinion, so if you disagree, then no harm done, of course I don't mind if you disagree, but this is just how I make poses and how I hold myself to my own standards when it comes to making them. I'm an extremely nit-picky person, as well as a perfectionist, and if my poses aren't perfect when I go in game and test them to get pictures for my stories, I don't use them. Please, do not misinterpret anything I say as if I were fact or think that I am telling you this is the way it has to be done when making poses. Everyone has their own style, this is just a way of showing how I do it.
With all of that in mind, let's finally get started!
__________________________________________
Some vital, need-to-know keys:
Right clicking on a joint = Selects that joint (white circle)
Left clicking = Deselects the joint selected (black circle)
R (pressed once) = Rotate selected joint left and right
R (pressed twice) = Circular rotation of joint selected
Pressing 1 = Frontal view
Pressing 3 = Side view (left)
Pressing 7 = Top view
Pressing Ctrl+1 = Back view
Pressing Ctrl+3 = Side view (right)
Pressing Ctrl+7 = Bottom view
All numbers in between = Slight turns/rotations/view points
Scrolling using mouse = Moves view up and down
Scrolling while holding Ctrl button = Moves view left and right
Pressing 5 = Internal View
I think that's it XD
__________________________________________
For this pose, I'll be using my Generation 4 heir from my patriarchal legacy TIDL, Oliver Dubois, who has a shy, bashful, cute personality, so that's the look I'll be going for.
These are the steps I'll be covering:
Head tilted down slightly
Eyes looking up
Bashful smirk
One hand at side, the other behind head
Somewhat relaxed yet shy look/stance
One knee slightly bent
__________________________________________
1] UPPER BODY - ARMS, CLAVICLE, WRIST and FINGERS
There have been so many times in the beginning of my posing days where I look at my pose and I have everything done but the hands/fingers, and I wanna rip my hair out because if they're not done first, the position the arms/shoulders/wrists are angled at in the end makes it really difficult to fix or adjust, and you never want your hands to look unnatural like this:

The whole point of this first process is to make the hands look natural and relaxed so when you move the wrist/elbow/arm, the hand is already looking natural and relaxed, like this:

When using R or R+R, it helps to look at the bottom left corner of your screen at the degree the joints are moving in (the X and Y axis/rotation degree):

(Rotation: 8.63) (Trackball: -8.02, 5.16)
Looking at these degrees will help you a ton as you make your pose, especially when it comes to doing the eyes/eyelids, but we'll get to those later.
Usually, I just eyeball it now-a-days because I'm used to how much I need to bend the fingers in order to get the relaxed feel that I want, but I'll give you a general degree at which the hands/fingers look their best. A way of knowing exactly what I mean is by letting your own arm hang at your side, arm/wrist/fingers relaxed completely. Do you notice how your wrist and each joint in your fingers are slightly bent naturally towards your thigh when completely relaxed? That's what we want to achieve right now.
Also know that from the front view (1), the left side of the body (your right), is measured is positive when rotated down, and the right side (your left), is measured in negative when rotated down. Keep this in mind 'cause I'll be using positives and negatives as I continue so you know which direction to go.
BUT, before we do the fingers (i know.. i lied about those being first lol), first right click on the left clavicle (your right from front view) and rotate it about 5.00 degrees down.
Do the same for the right clavicle (your left from front view) and rotate it down like the other until the degree reads about -5.00
((IT DOES NOT HAVE TO BE EXACT, THIS IS JUST HOW I LIKE THEM TO LAY!))
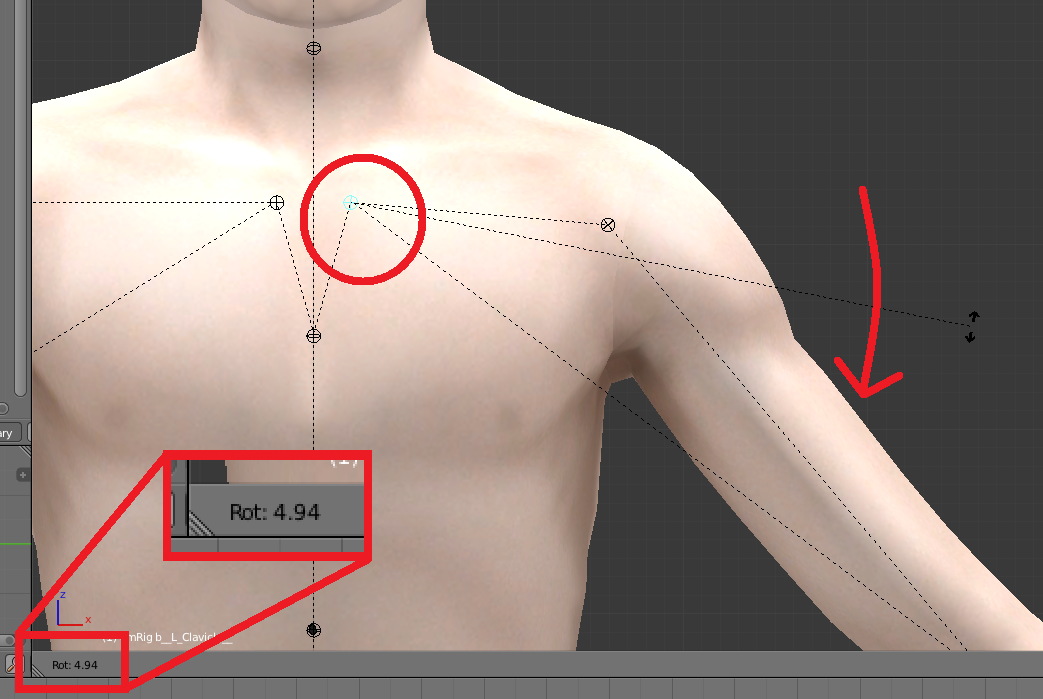
(Rotation: 4.94)
Then, select the left UpperArm and rotate it down to about 32.00 to 33.00
Do the same for the right UpperArm, bringing it down to about -32.00 to -33.00

(Rotation: 32.36)
Now that our arm is relaxed, let's actually get to the hands.. XD
Approaching from the left angle (pressing 3), right click on the index finger's first joint (the one closest to the floor)

Now press the 1 key to bring yourself back to the front view with the digit still selected.
Scroll in towards the hand to get a better view and then press the R button to rotate it. Rotate the digit while looking at the X,Y,Rotate axis in the bottom left corner and to give the joint the most relaxed look, rotate it to about 11.00 or 12.00.

(Rotation: 11.31)
Do the same step over again for all of the other first digits.

After those are all rotated, we can now focus on the joints of the fingers just above the ones you just moved/the ones below the knuckles.

Do the same step as before, right clicking on each joint from left to right or right to left or whatever you want to do and rotate those joints down to about 8.00

(Rotation: 7.92)
Now we can focus on the knuckles and really, you're going to be doing the exact same thing as you have been doing for the other finger joints, rotating each knuckle down to roughly between 7.00 and 9.00, whatever looks best to you.

(Rotation: 7.74)
Yay! The hand is finally beginning to take its relaxed shape! ^o^
One thing that I particularly like to do to give the hand even more shape is to tweak the index knuckle and the pinkie knuckle. If it doesn't really matter to you and you're not as picky as I am, feel free to scroll passed this step and pick up again where I begin talking about the thumb.
- OPTIONAL STEP -
Press 3 to get to the side view, then rick click on the index knuckle.
With this step, we're going to be pressing the R key twice instead of once, so our cursor in blender now looks like a compass with North and South being green arrows, and East and West being red arrows.

Now that your cursor looks like this, very gently go towards the left, which will cause the finger to be pulled more towards the palm and other fingers, bringing it inward.

If you look in the bottom left corner where it says "Trackball" now instead of Rotate, the number on the left tells you how far you're going up and down (the green arrows), while the second number tells you how far it's going left and right (the red arrows).
Now with the index finger done and placed, right click on the knuckle of the pinkie finger and do the same thing, but opposite direction.

(Trackball: 2.29, -15.47)
If you look in the bottom left corner where it says "Trackball" now instead of Rotate, the number on the left tells you how far you're going up and down (the green arrows), while the second number tells you how far it's going left and right (the red arrows).
Now with the index finger done and placed, right click on the knuckle of the pinkie finger and do the same thing, but opposite direction.
(Trackball: 0.57, 14.90)
IF YOU SKIPPED THE LITTLE STEP ABOVE, STOP SCROLLING NOW AND CONTINUE READING FROM HERE! :D
Now we're going to focus on the thumb.
I usually always start at the first joint, the one closest to the wrist.
For this step, we're going to rick click on that joint, then press R 2x to get that red and green compass again, but we're going to be going diagonally (northwest) and only a little, which will pull the thumb closer towards the palm, like so:

For this step, we're going to rick click on that joint, then press R 2x to get that red and green compass again, but we're going to be going diagonally (northwest) and only a little, which will pull the thumb closer towards the palm, like so:
(Trackball: -16.04, -20.05)
Now go to the next joint down, doing the exact same thing to the first joint you just did, going diagonally as well the same way only a little, but just a little more to west than northwest:

You want the highlighted compass, North to South, to line up exactly with the black lines:
(this is mostly just a guideline for you to do that makes it easier to remember)

While still selecting that same joint you just did, press the R only once this time to go back to the black arrows, the 'rotate' option, and rotate the joint counter clockwise, like this:

Now do the same for the last joint at the end, rotating it counter clockwise:

Now, press 1 to go to frontal view and right click on the first joint of the thumb again, then press R once to rotate it and bring it closer to the rest of the fingers:

If you like how the hand looks, then you're now done with the hand! Feel free to tweak anything you don't like and make the hand how you want it. Again, this is how I do things, so along the way you can do whatever you want, you don't have to do any of this haha
The hand is now complete! Great job! Now all you need to do is follow these steps one more time for the other clavicle, arm, and whole hand and in the end, your rig should look like this:

At this stage, this is my base. Whenever I begin a pose, this is typically what I end up with 99.9% of the time before I even begin to make the pose it's own or unique or different or whatever, so this is actually a good time to save this rig so that you can skip the tiring and tedious process of doing the finger joints over and over and over again! Hahaha
If you don't know how to save a rig, then just right click on any joint on the body and then press the "A" button twice, or until every joint is highlighted.
Then, press the "I" button once and select the "LocRot".
Then, go to File > Export > Sims 3 Animation.
For adults, always begin the pose with "a_" then whatever you want after.
( a_example1 )
For children = c_
For toddlers = p_
I saved mine as (a_READY_TO_GO) for obvious reasons, but of course you can name yours whatever you want. So now, when you begin a pose, import this rig and it'll cut the posing time a ton, if not completely in half!
Moving on..
3] LEGS
Press 1 to get a frontal view, always, when first beginning with the leg/thigh, because if you just click it once, or twice, or even three times from while at angle 3, it'll give you 3 different options that never highlight exactly what you want, as well as the options for the other thigh, too. I find it's easiest to just press 1 so you have a frontal view so you know exactly which thigh you're selecting first, then press 3 to go to a side view, but I'll explain all of this more in depth below.
Legs are somewhat difficult, not as much as the hands/fingers, just difficult in their own way if you're not in the "1" view point.
Press 1 to get to the front view, like so, and right click on the left thigh joint (your right):

This is the leg we're working on right now and we need it to look more natural (manly) for this pose, since I'm posing a male (Oliver, specifically).
All this step is is to make a "wide legged" stance, one that most men stand at (imo).
(and as well as sit, spread legged an all)
With that joint selected, you spread the leg only a little, pressing the R key twice to get the "trackball" option again and you're going to pull the thigh joint to the right, but only just a little!
Like this:

Again, as stated before, keep the first number (north/south) to a minimum for this step, but the second number (east/west) needs to be larger, thus spreading the leg.
When first trying to select the thigh joint from view 1, it will always choose the "ROOT_blind" joint, which will highlight their entire pelvis, looking like a plus sign:

This is what we don't want, so, right click again over the right joint (your left) and it will select the thigh you want.

Now with the left leg slightly turned already, which we covered just above a few steps ago, we can move to the other one, which will involve more of an umph to achieve the pose we're going for.
Let's start with the rotation of it, first.
Right click the right joint (your left, which you should already have highlighted from the step just above) and then press the 3 button so we're at side view:

Yeah, notice how you can't tell which thigh is selected now? That's what I was talking about before, which is why always selecting the thigh joint in view 1 is the best/quickest option (again, imo).
Now that it's selected, we're going to rotate it, pressing the R once and turning it only slightly clockwise, bringing your cursor downwards so the right leg sticks out just slightly:

Now we're going to go to the knee, right clicking on it as such, and bringing it the opposite direction you just did the thigh/hip, bending it counter clockwise:

Now focus on the ankle, rotating it counter clockwise just like you did the knee, until the foot joint meets the same level as the other foot joint of the left:

Now we focus on the toes!
Right click on the right toe joint and we're going to rotate that clockwise, so the toes line up in the end:

Now, we're going to go back to view 1, front view, and now that the toes are curled nicely on the right foot, we're going to pull the thigh like we had done the other one before, but the opposite direction so it's more wide-spread:
(remember to right click the right thigh twice again or else you'll be selecting the entire hip)
This is what you want highlighted:

Now that that's selected, we're going to press the R button twice to get the trackball again, yet while we're trackballing the thigh, you need to watch the bottom of the toes that we just curled upward and make sure they stay level with the other foot.
After pressing the R button twice so we get the trackball while in "1" view, move the cursor left to make the leg spread to the left:

After this, go back to the left hip (your right) and rotate it just slightly inward (clockwise):

(Trackball -5.73, -9.74)
(this is mostly just a guideline for you to do that makes it easier to remember)
While still selecting that same joint you just did, press the R only once this time to go back to the black arrows, the 'rotate' option, and rotate the joint counter clockwise, like this:
(Rotation: -8.41)
Now do the same for the last joint at the end, rotating it counter clockwise:
(Rotation: -15.64)
Now, press 1 to go to frontal view and right click on the first joint of the thumb again, then press R once to rotate it and bring it closer to the rest of the fingers:
(Rotation: -9.54)
If you like how the hand looks, then you're now done with the hand! Feel free to tweak anything you don't like and make the hand how you want it. Again, this is how I do things, so along the way you can do whatever you want, you don't have to do any of this haha
The hand is now complete! Great job! Now all you need to do is follow these steps one more time for the other clavicle, arm, and whole hand and in the end, your rig should look like this:
At this stage, this is my base. Whenever I begin a pose, this is typically what I end up with 99.9% of the time before I even begin to make the pose it's own or unique or different or whatever, so this is actually a good time to save this rig so that you can skip the tiring and tedious process of doing the finger joints over and over and over again! Hahaha
If you don't know how to save a rig, then just right click on any joint on the body and then press the "A" button twice, or until every joint is highlighted.
Then, press the "I" button once and select the "LocRot".
Then, go to File > Export > Sims 3 Animation.
For adults, always begin the pose with "a_" then whatever you want after.
( a_example1 )
For children = c_
For toddlers = p_
I saved mine as (a_READY_TO_GO) for obvious reasons, but of course you can name yours whatever you want. So now, when you begin a pose, import this rig and it'll cut the posing time a ton, if not completely in half!
Moving on..
3] LEGS
Press 1 to get a frontal view, always, when first beginning with the leg/thigh, because if you just click it once, or twice, or even three times from while at angle 3, it'll give you 3 different options that never highlight exactly what you want, as well as the options for the other thigh, too. I find it's easiest to just press 1 so you have a frontal view so you know exactly which thigh you're selecting first, then press 3 to go to a side view, but I'll explain all of this more in depth below.
Legs are somewhat difficult, not as much as the hands/fingers, just difficult in their own way if you're not in the "1" view point.
Press 1 to get to the front view, like so, and right click on the left thigh joint (your right):
This is the leg we're working on right now and we need it to look more natural (manly) for this pose, since I'm posing a male (Oliver, specifically).
All this step is is to make a "wide legged" stance, one that most men stand at (imo).
(and as well as sit, spread legged an all)
With that joint selected, you spread the leg only a little, pressing the R key twice to get the "trackball" option again and you're going to pull the thigh joint to the right, but only just a little!
Like this:
(Trackball: 1.72, 8.59)
Again, as stated before, keep the first number (north/south) to a minimum for this step, but the second number (east/west) needs to be larger, thus spreading the leg.
When first trying to select the thigh joint from view 1, it will always choose the "ROOT_blind" joint, which will highlight their entire pelvis, looking like a plus sign:
This is what we don't want, so, right click again over the right joint (your left) and it will select the thigh you want.
Now with the left leg slightly turned already, which we covered just above a few steps ago, we can move to the other one, which will involve more of an umph to achieve the pose we're going for.
Let's start with the rotation of it, first.
Right click the right joint (your left, which you should already have highlighted from the step just above) and then press the 3 button so we're at side view:
Yeah, notice how you can't tell which thigh is selected now? That's what I was talking about before, which is why always selecting the thigh joint in view 1 is the best/quickest option (again, imo).
Now that it's selected, we're going to rotate it, pressing the R once and turning it only slightly clockwise, bringing your cursor downwards so the right leg sticks out just slightly:
(Rotation: 12.03)
Now we're going to go to the knee, right clicking on it as such, and bringing it the opposite direction you just did the thigh/hip, bending it counter clockwise:
(Rotation: -25.86)
Now focus on the ankle, rotating it counter clockwise just like you did the knee, until the foot joint meets the same level as the other foot joint of the left:
(Rotation: -6.10)
Now we focus on the toes!
Right click on the right toe joint and we're going to rotate that clockwise, so the toes line up in the end:
(Rotation: 14.38)
(remember to right click the right thigh twice again or else you'll be selecting the entire hip)
This is what you want highlighted:
Now that that's selected, we're going to press the R button twice to get the trackball again, yet while we're trackballing the thigh, you need to watch the bottom of the toes that we just curled upward and make sure they stay level with the other foot.
After pressing the R button twice so we get the trackball while in "1" view, move the cursor left to make the leg spread to the left:
(Trackball: 0.57, -15.47)
After this, go back to the left hip (your right) and rotate it just slightly inward (clockwise):
(Rotation: 1.72)
Do the same thing, just slightly, for the right thigh/hip joint, bringing it inward (counter clockwise) until the right toes line up with the left again.
 (Rotation: -2.20)
Now, your model should look like this:

Legs are done! Awesome job!
3] EYELIDS
For this, we need to make sure the eyes look relaxed, but we'll be focusing on the eyes specifically later on in a different step when it comes to the "view point". But, let's just get this out of the way now.
There are 3 different key points to the "joint" of the eye (press 1 and scroll in a ton on the face):

Right clicking on the eye:
One Right Click = Right/Left Eye
Two Right Clicks = Right/Left UpLid
Three Right Clicks = Right/Left LoLid
We want to control the upper eyelid, so you need to right click the eye twice.
With the upper eyelid selected, press R twice to get our 'trackball' and we're going to slowly and gently pull down the lid only a little, so the eye has a more relaxed feel to it, like this:

Now do this to the other eyelid and your face should look like this:

Now with the eyelids done, we're going to ignore the eyes for a little bit and continue on to a different step, but we'll come back to them later.
4] ARMS
For this, we're going to leave one arm alone completely and leave it at the rigs side. I'm going to choose the right arm (your left) to work on for this pose:

Since we want this arm to be high up with the hand touching the back of the head, we're going to start with the clavicle first, rotating the black arrows clockwise so the arm comes up, let's say between 17.00 - 19.00:

Doing this instead of leaving the clavicle alone and only moving the arm results in weird, awkward shoulders that just look wayyyy to posed, instead of natural and more human, like we're trying to achieve, which will become apparent later on.
This is what we don't want:

Anyways..
Moving on to the arm/shoulder, there are a number of ways you can approach this and still get the same result.
You could rotate the arm up, then bring it inwards towards the chest using R+R..
You could rotate the arm down so it hugs the body, then go to view 3 and rotate it up from there..
Or you could just use R+R from the beginning the trackball the arm until it looks how you want (which is what I do most of the time) but we're going to do this step by step until it becomes easier the more you do it.
Let's try the rotate-arm-down method.
Right click on the UpperArm and press R once, then rotate the arm counter clocwise until it hugs the body, like this:

Now, your model should look like this:
Legs are done! Awesome job!
3] EYELIDS
For this, we need to make sure the eyes look relaxed, but we'll be focusing on the eyes specifically later on in a different step when it comes to the "view point". But, let's just get this out of the way now.
There are 3 different key points to the "joint" of the eye (press 1 and scroll in a ton on the face):
Right clicking on the eye:
One Right Click = Right/Left Eye
Two Right Clicks = Right/Left UpLid
Three Right Clicks = Right/Left LoLid
We want to control the upper eyelid, so you need to right click the eye twice.
With the upper eyelid selected, press R twice to get our 'trackball' and we're going to slowly and gently pull down the lid only a little, so the eye has a more relaxed feel to it, like this:
(4.01 - 0.00)
Now do this to the other eyelid and your face should look like this:
Now with the eyelids done, we're going to ignore the eyes for a little bit and continue on to a different step, but we'll come back to them later.
4] ARMS
For this, we're going to leave one arm alone completely and leave it at the rigs side. I'm going to choose the right arm (your left) to work on for this pose:
Since we want this arm to be high up with the hand touching the back of the head, we're going to start with the clavicle first, rotating the black arrows clockwise so the arm comes up, let's say between 17.00 - 19.00:
(Rotation: 18.12)
Doing this instead of leaving the clavicle alone and only moving the arm results in weird, awkward shoulders that just look wayyyy to posed, instead of natural and more human, like we're trying to achieve, which will become apparent later on.
This is what we don't want:
Anyways..
Moving on to the arm/shoulder, there are a number of ways you can approach this and still get the same result.
You could rotate the arm up, then bring it inwards towards the chest using R+R..
You could rotate the arm down so it hugs the body, then go to view 3 and rotate it up from there..
Or you could just use R+R from the beginning the trackball the arm until it looks how you want (which is what I do most of the time) but we're going to do this step by step until it becomes easier the more you do it.
Let's try the rotate-arm-down method.
Right click on the UpperArm and press R once, then rotate the arm counter clocwise until it hugs the body, like this:
(Rotation: -23.04)
Then, going to view Ctrl+3 with the upper arm still selected, rotate it out and away from the body, counter clockwise, like so:

Right now the arm still looks a little weird:

So we're going to fix that (or at least the best we can) from view 1.
With the upper arm still selected, we're going to rotate it just a little:

(Rotation: -87.36)
Right now the arm still looks a little weird:
So we're going to fix that (or at least the best we can) from view 1.
With the upper arm still selected, we're going to rotate it just a little:
(Rotation: 30.82)
You may have noticed that notch poking out from the chest connecting to the upper arm, but we're going to ignore this completely, because if you turn the arm any more, it will blend well with the chest and look normal, but it will be impossible to achieve what we're trying to do with this arm if we do. This is one of those things where you kinda just need to ignore it because it doesn't get much better than this. But, when using this pose in the end, it's very easy to completely leave that part of the Sim out and keep it from being seen in pictures at the right angles.
Now we're going to bring the forearm back by bending the elbow, which will bring us closer to being able to put the hand behind the rigs head like we want.
Go to Ctrl+3 view and right click on the R_forearm, then press the R button once so we can rotate it and bring the arm back and towards the head:
(Rotation: -146.92)
From here, we're going to stay in this Ctrl+3 view and we're going to use the trackball on the elbow, R+R, and we're going to twist it upward until we can see the back of the hand:

Since the hand still isn't quite at the part of the back of the head that I'm going for, we're going to go back to view 1 and tweak the arm/forearm a little.
Okay, know what I said before about that notch under the armpit connecting to the chest and that you should just ignore it? Well, we're going to try again at making it look right, or at least the best we can, which also deals with our next step anyways, so might as well try, huh?
With the upper arm still selected, press the R once and rotated clockwise, pulling the arm towards the face:

It's okay if the hand goes a little into the face/hairline, we're going to be adjusting that very soon.
Now we're going to tweak the clavicle again to bring the back of the hand closer to the back of the head like we want.
Tweaking the clavicle a little instead of the arm or forearm in order to bring the hand back far enough is better because it will still keep the entire arm looking natural, whereas if you continued to turn and rotate the arm/forearm, it would give that shoulder that boxy, weird, robotic feel to it like I had pictured before and that's not what we want.
From view 1, select the clavicle, then go to Ctrl+3 view and rotate the arrows up, bringing the entire arm back and you'll begin to see what we're finally trying to achieve:

(Trackball: -29.22, 15.47)
Since the hand still isn't quite at the part of the back of the head that I'm going for, we're going to go back to view 1 and tweak the arm/forearm a little.
Okay, know what I said before about that notch under the armpit connecting to the chest and that you should just ignore it? Well, we're going to try again at making it look right, or at least the best we can, which also deals with our next step anyways, so might as well try, huh?
With the upper arm still selected, press the R once and rotated clockwise, pulling the arm towards the face:
(Rotation: 27.14)
It's okay if the hand goes a little into the face/hairline, we're going to be adjusting that very soon.
Now we're going to tweak the clavicle again to bring the back of the hand closer to the back of the head like we want.
Tweaking the clavicle a little instead of the arm or forearm in order to bring the hand back far enough is better because it will still keep the entire arm looking natural, whereas if you continued to turn and rotate the arm/forearm, it would give that shoulder that boxy, weird, robotic feel to it like I had pictured before and that's not what we want.
From view 1, select the clavicle, then go to Ctrl+3 view and rotate the arrows up, bringing the entire arm back and you'll begin to see what we're finally trying to achieve:
(Rotation: -18.95)
From the same Ctrl+3 view, select the wrist and press R twice, going to our trackball and we're going to rotate the green/red arrows down, bringing the hand out of the head/hairline and pointing a little above the direction West:

With the wrist still selected, we're going to now rotate the wrist up so we bring the hand down just a little:

(Trackball: 23.49, 3.44)
With the wrist still selected, we're going to now rotate the wrist up so we bring the hand down just a little:
(Rotation: -14.11)
I know.. These slight adjustments get to be very tedious and annoying, but in order to achieve a truly relaxed and natural look, I think they're completely necessary, and the more poses you do, the more easier this is going to be and you'll be able to make a pose in less than 5 minutes, I guarantee, with practice!
For now, we're going to leave the hand/wrist alone and come back to it later, but let's keep going. We're almost done, believe it or not!
5] BACK, NECK AND HEAD
For me, the most relaxed look lies a lot in the back and how the Sim is standing. With the straight, wooden board look we have now, it doesn't give me that effect. Fixing up the back a little won't take long and it actually makes a big difference! ..At least to me XD
Going to view 3, we're going to select "Spine0".
Be careful not to choose the pelvis below it which is really, really close to that joint:
With the "Spine0" selected, we're going to rotate it, pressing R once and pulling the back back:

(Rotation: 10.27)
Now we're going to select "Spine1", which is above "Spine0", and we're going to rotate that counter clockwise, which will pull the chest forward:

Now our model doesn't look so stiff!
Since the arm got pulled back just a little during this process, we're going to fix that really quick so it's lying more straight at his side again:

Now our model doesn't look so stiff!
Since the arm got pulled back just a little during this process, we're going to fix that really quick so it's lying more straight at his side again:
(Rotation: 6.00)
Now onto the neck.
We're still focusing on the Sim itself.. Or, well, I am at least hahaha
Oliver, in whom which, in my mind, would have his head down, but eyes looking up, just to give off a "shy" look, so let's do just that.
In view 3, select the "Neck" and rotate the black arrows counterclockwise, bringing the head just slightly forward:

Do this again, but with the "Head" now selected:

I'm going to now turn his head a little, so that in pictures, he isn't just looking straight ahead, but just to the side, as if he had seem someone he likes *cough*isaiah*cough* come into the same room he was in across the way.
Press 1 to get to the front view, but this time, we're going to press the number 6 twice, so we're going in from the angle we want the Sim to be looking.

Now zoom in and select the "Neck".

We're going to press R twice so we get our trackball again and we're going to pull it towards the right only a little:

We're not aiming for the eyes to look at us by turning the neck or the head, we're going to be turning the eyes ourselves, so don't worry if the eyes aren't look at you just yet!
6] FACE
Now onto the eyes.
Zoom in a lot more so that you can get the best look possible and so that you're not guessing from far away if the eyes are meeting your own or not:

We're still focusing on the Sim itself.. Or, well, I am at least hahaha
Oliver, in whom which, in my mind, would have his head down, but eyes looking up, just to give off a "shy" look, so let's do just that.
In view 3, select the "Neck" and rotate the black arrows counterclockwise, bringing the head just slightly forward:
(Rotation -3.97)
Do this again, but with the "Head" now selected:
(Rotation: -8.89)
I'm going to now turn his head a little, so that in pictures, he isn't just looking straight ahead, but just to the side, as if he had seem someone he likes *cough*isaiah*cough* come into the same room he was in across the way.
Press 1 to get to the front view, but this time, we're going to press the number 6 twice, so we're going in from the angle we want the Sim to be looking.
Now zoom in and select the "Neck".
We're going to press R twice so we get our trackball again and we're going to pull it towards the right only a little:
(Trackball: -2.86, 10.89)
We're not aiming for the eyes to look at us by turning the neck or the head, we're going to be turning the eyes ourselves, so don't worry if the eyes aren't look at you just yet!
6] FACE
Now onto the eyes.
Zoom in a lot more so that you can get the best look possible and so that you're not guessing from far away if the eyes are meeting your own or not:
For some reason, idk why, this might be just me, but I found that working on the eye farthest from you is easiest, so let's start with the right eye (our left).
Right click the right eye once, then press R twice so we get our trackball. From here, pull the trackball to the right, pulling the eye so it looks towards us and when you feel comfortable enough to say "he's looking at me", then you're done. BUT, before you let it go so you can work on the other eye, memorize the trackball axis' you have so that instead of guessing, you can bring the other eye to those exact coordinates (or at least as close as possible) and the eye should be looking at you without you needing to wonder and struggle.
Right Eye:
 (Trackball: -1.15, 15.47)
Left Eye:

Result:

Meh.. I think he's looking at me, and if not, he is enough hahaha
With him looking at you now, let's make him just a little bit happier and give him a small smile. Whenever I focus on the mouth, lips more specifically, I usually always try to focus on them by constantly looking them straight on.
Before, we had pressed 1 to get to the frontal view, then pressed 6 twice to go towards the right, but now we're going to press 1 and then 6 only once, so now the face/lips are facing you.

With this now you're view, we're going to select the "LeftMouth". Press the G button, which is grab, and drag it just a little North East:

You're going to get a lot of different numbers in the bottom left corner, but I barely ever pay attention to them, so I'm not going to highlight them like I have been for Rotate and Trackball.
Now do the same for the other side until you like how the smile looks. Just eyeball it yourself and go with whatever looks right to you.

When you press 6 one more time, it will bring you to the position we were in before when the eyes ween looking at you and he should have a small, cute smile now:

Right click the right eye once, then press R twice so we get our trackball. From here, pull the trackball to the right, pulling the eye so it looks towards us and when you feel comfortable enough to say "he's looking at me", then you're done. BUT, before you let it go so you can work on the other eye, memorize the trackball axis' you have so that instead of guessing, you can bring the other eye to those exact coordinates (or at least as close as possible) and the eye should be looking at you without you needing to wonder and struggle.
Right Eye:
Left Eye:
(Trackball: -1.15, 15.47)
Result:
Meh.. I think he's looking at me, and if not, he is enough hahaha
With him looking at you now, let's make him just a little bit happier and give him a small smile. Whenever I focus on the mouth, lips more specifically, I usually always try to focus on them by constantly looking them straight on.
Before, we had pressed 1 to get to the frontal view, then pressed 6 twice to go towards the right, but now we're going to press 1 and then 6 only once, so now the face/lips are facing you.
With this now you're view, we're going to select the "LeftMouth". Press the G button, which is grab, and drag it just a little North East:
You're going to get a lot of different numbers in the bottom left corner, but I barely ever pay attention to them, so I'm not going to highlight them like I have been for Rotate and Trackball.
Now do the same for the other side until you like how the smile looks. Just eyeball it yourself and go with whatever looks right to you.
When you press 6 one more time, it will bring you to the position we were in before when the eyes ween looking at you and he should have a small, cute smile now:
Welp, we're almost done! The last step is to fix those fingers at the back of the head that we said we'd come back to later!
7] FINAL TOUCHES
From view 3, I'm going to press the number 6 four times, so that I'm able to see the back of the head as well as the palm of the hand and fingertips.

With the wrist already selected (as shown above), I'm going to press R twice to get our trackball and I'm going to pull the hand towards the head more so there isn't a gap, but not too much to the point where the fingers are in the hair.

With the palm and wrist now in their place, we're done with those, and all we have left is to do the fingers and thumb!
Now, press Ctrl+3 and then press the number 4 two times, so we have this view:

As you can see above, I already have the joint of the thumb selected and I'll be working on that first. With this selected, we're not going to rotate it counter clockwise, like so:

7] FINAL TOUCHES
From view 3, I'm going to press the number 6 four times, so that I'm able to see the back of the head as well as the palm of the hand and fingertips.
With the wrist already selected (as shown above), I'm going to press R twice to get our trackball and I'm going to pull the hand towards the head more so there isn't a gap, but not too much to the point where the fingers are in the hair.
(Trackball: 0.57, -11.46)
With the palm and wrist now in their place, we're done with those, and all we have left is to do the fingers and thumb!
Now, press Ctrl+3 and then press the number 4 two times, so we have this view:
As you can see above, I already have the joint of the thumb selected and I'll be working on that first. With this selected, we're not going to rotate it counter clockwise, like so:
(Rotation: -19.06)
Next, we're going to use press R twice so we get our trackball, then we're going to pull the thumb towards the nape of the neck. It's okay if your thumb goes a little into the hair, but be careful not to pull it too much to where it's going into the skull or the neck itself.
This is how mine turned out. Sure, not much different, from what it seems from this angle, but it now sits nicely along the skin instead of protruding out and looking unnatural.

This is how mine turned out. Sure, not much different, from what it seems from this angle, but it now sits nicely along the skin instead of protruding out and looking unnatural.
(Trackball: 1.15, -9.17)
Now we're going to focus on the fingers, and first, we're going to rotate them to spread them out a little bit before using the trackball and bringing them closer to the head.
So, select each knuckle joint and pull the fingers apart just a little. Use your eyes for judgement and part them however far apart you'd like. All that I ended up doing was moving the index and pinkie finger away from the middle and ring finger, but this is how I wanted mine to look:

So, select each knuckle joint and pull the fingers apart just a little. Use your eyes for judgement and part them however far apart you'd like. All that I ended up doing was moving the index and pinkie finger away from the middle and ring finger, but this is how I wanted mine to look:
Now we're going to select all of those knuckles again and this time, instead of rotating, we're going to use the trackball (R+R), pulling the fingers towards the head. I like to make it look as if their fingers are in their hair only a little, it's just my own preference, so that's what I'll be doing.
Pinkie Finger:
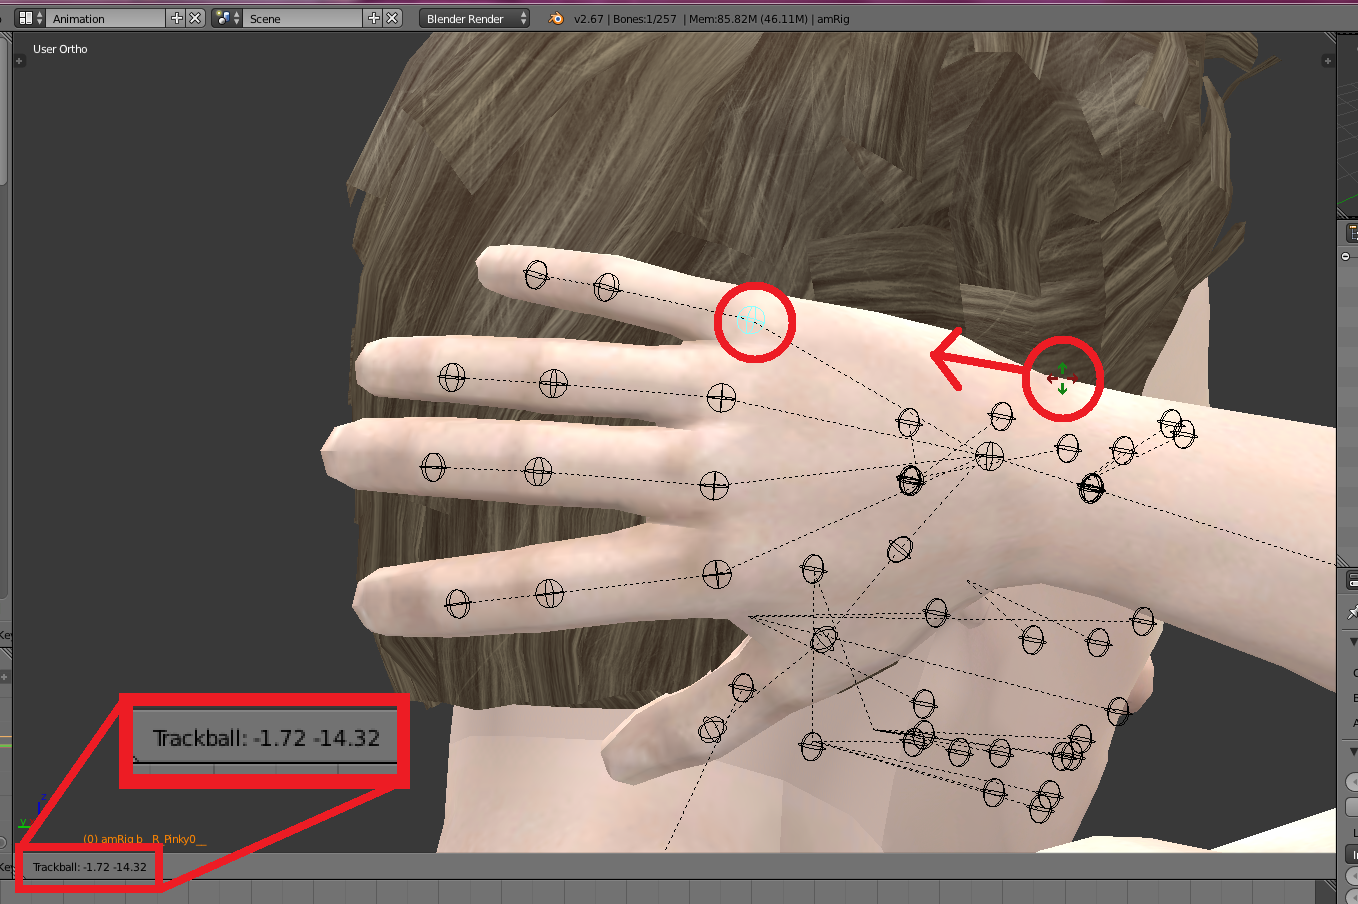
(Trackball: -1.72, -14.32)
Pinkie Finger:
(Trackball: -1.72, -14.32)
Ring Finger:
 (Trackball: 0.57, -21.77)
Middle Finger:
 (Trackball: -4.01, -18.91)
Index Finger:
 (Trackball: 6.30, -20.05)
After the fingers have all been pulled towards the skull, rotate around the angle your looking at it to make sure everything looks in place before committing to save it.
Okay, we're all done! Awesome job!


If you know how to do all of this, as far as saving your rig as a pose and putting it in game, then feel free to skip this part.
Now that we're all done, let's press the 'A' button twice so we select everything again and then press the letter 'I', then choose LocRot.

Middle Finger:
Index Finger:
After the fingers have all been pulled towards the skull, rotate around the angle your looking at it to make sure everything looks in place before committing to save it.
Okay, we're all done! Awesome job!
If you know how to do all of this, as far as saving your rig as a pose and putting it in game, then feel free to skip this part.
Now that we're all done, let's press the 'A' button twice so we select everything again and then press the letter 'I', then choose LocRot.
Then go to File > Export > Sims 3 Animation and name it whatever you want.
I named mine "a_PoseTutorial_1"

After you've saved your pose, close out Blender and then open the program "s3pe"

Always select "File > New" FIRST.
Then, select Resource > Import > From File

Next, find where your saved rig is and double click to bring it into your s3pe
I always need to scan over mine for a while 'cause I always have like 418947191 poses in there.. LOL

After you've found it and have selected it to bring it into s3pe, a window will pop up, but just completely ignore it, don't change anything, and just press "OK"
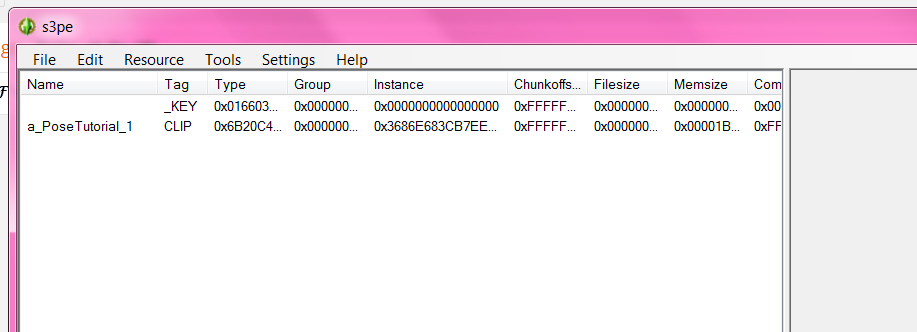
With it now in your s3pe, select File > Save As..
Then, name it whatever you had saved it as when you made it in Blender. I've noticed that even if I name something different than what I had originally named it, it doesn't work in game and you need to redo it all over again.
Now, add the .package file you had just made that pose into into your game in your Pose folder.
Let's go in game now and see how it looks!
With the Pose Player somewhere within the town, you can just click on the Sim themselves. Select Pose Player > Pose by Name

And since this is a pose inspired by my Sim, Oliver Dubois, it only makes sense to use him to model it. XD
Well, here's our finished pose!


I named mine "a_PoseTutorial_1"
After you've saved your pose, close out Blender and then open the program "s3pe"
Always select "File > New" FIRST.
Then, select Resource > Import > From File
Next, find where your saved rig is and double click to bring it into your s3pe
I always need to scan over mine for a while 'cause I always have like 418947191 poses in there.. LOL
After you've found it and have selected it to bring it into s3pe, a window will pop up, but just completely ignore it, don't change anything, and just press "OK"
With it now in your s3pe, select File > Save As..
Then, name it whatever you had saved it as when you made it in Blender. I've noticed that even if I name something different than what I had originally named it, it doesn't work in game and you need to redo it all over again.
Now, add the .package file you had just made that pose into into your game in your Pose folder.
Let's go in game now and see how it looks!
With the Pose Player somewhere within the town, you can just click on the Sim themselves. Select Pose Player > Pose by Name
And since this is a pose inspired by my Sim, Oliver Dubois, it only makes sense to use him to model it. XD
Well, here's our finished pose!
Of course, if you have any questions about my tutorial, I'll be more than happy to answer them. Hopefully this will help you understand a lot more about joints and how they move, or are supposed to move, in order to make the most out of your poses and also your story telling needs with the poses!
Good luck and have fun!
Good luck and have fun!
Happy Simming!
No comments:
Post a Comment